No products in the cart.
The Ultimate Guide to Vermicomposting process
The Ultimate Guide to vermicomposting process: Transforming Waste into Nutrient-Rich Soil
Are you tired of seeing food scraps go to waste? Do you wish there was a way to turn your kitchen waste into something valuable for your garden? Well, you’re in luck! vermicomposting process is an excellent solution that can transform your organic waste into nutrient-rich soil using the power of worms. In this article, we’ll dive deep into the vermicomposting process process and show you how easy it is to start your own worm bin at home.

Table of Contents
| Sr# | Headings |
|---|---|
| 1 | Introduction to vermicomposting process |
| 2 | What is vermicomposting process? |
| 3 | Benefits of vermicomposting process |
| 4 | Choosing the Right Worms |
| 5 | Setting Up Your Worm Bin |
| 6 | Feeding Your Worms |
| 7 | Maintaining Your Worm Bin |
| 8 | Harvesting Vermicompost |
| 9 | Using Vermicompost in Your Garden |
| 10 | Troubleshooting Common Issues |
| 11 | Conclusion |
| 12 | Frequently Asked Questions (FAQs) |
Introduction to vermicomposting process
Let’s start with the fundamentals before getting into the specifics. vermicomposting process is a simple yet effective way to recycle organic waste into valuable compost using the natural digestive process of worms. Imagine turning your kitchen scraps into black gold for your garden. Sounds amazing, right?
What is vermicomposting process?
vermicomposting process is the process of using worms, usually red wigglers (Eisenia fetida), to decompose organic waste into a nutrient-rich material known as vermicompost or worm castings. This process not only reduces the amount of waste going to landfills but also produces a highly beneficial soil amendment for your plants.
Benefits of vermicomposting process
There are numerous benefits to vermicomposting process, making it a win-win solution for both you and the environment:
- Reduces Waste: vermicomposting process significantly cuts down on the amount of organic waste that ends up in landfills.
- Produces Nutrient-Rich Soil: Worm castings are rich in nutrients that enhance soil fertility and promote healthy plant growth.
- Eco-Friendly: It’s a natural and sustainable way to recycle organic matter.
- Cost-Effective: By producing your own compost, you save money on store-bought fertilizers and soil conditioners.
Choosing the Right Worms
When it comes to vermicomposting process, not all worms are made equal.. The most commonly used worms are red wigglers because they are excellent decomposers. Here are some tips for choosing the right worms:
- Red Wigglers (Eisenia fetida): These are the most popular choice due to their high reproduction rate and efficiency in breaking down organic matter.
- European Nightcrawlers (Eisenia hortensis): Another good option, though they are larger and less efficient compared to red wigglers.
Setting Up Your Worm Bin
Creating a worm bin is easy and can be done with materials you may already have at home. Here’s a step-by-step guide to setting up your vermicomposting process system:
Materials Needed
- A bin or container (plastic or wooden)
- Material for bedding: coconut coir, cardboard, or shredded newspaper
- A handful of garden soil
- Red wigglers (worms)
Steps to Set Up
- Prepare the Bin: Drill small holes in the bin for ventilation and drainage.
- Add Bedding: Fill the bin with damp bedding material, making sure it’s moist but not soaking wet.
- Add Soil: Sprinkle a small amount of garden soil over the bedding to introduce beneficial microorganisms.
- Add Worms: Gently place the worms on top of the bedding.
- Cover: Place a lid on the bin, ensuring it has holes for air circulation.
Feeding Your Worms
Worms are not particularly picky eaters, but there are some dos and don’ts when it comes to feeding them:
What to Feed
- Fruit and vegetable scraps
- Coffee grounds and tea bags
- Crushed eggshells
- Shredded paper and cardboard
What to Avoid
- Meat and dairy products
- Oily and greasy foods
- Citrus fruits in large quantities
- Onions and garlic
Feed your worms in small amounts, and observe how quickly they consume the food. Overfeeding can lead to unpleasant odors and attract pests.
Maintaining Your Worm Bin
Keeping your worm bin in good condition is crucial for successful vermicomposting process. Here are some tips to ensure a healthy environment for your worms:
- Moisture Levels: Maintain a moisture level similar to a wrung-out sponge. Too dry, and the worms will dehydrate; too wet, and it can lead to anaerobic conditions.
- Temperature: Keep the bin in a location where the temperature stays between 55°F and 77°F (13°C to 25°C).
- Aeration: Regularly fluff the bedding to ensure proper airflow and prevent compacting.
- Monitoring: Check on your worms regularly to make sure they are healthy and active.
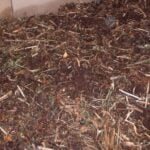
Harvesting Vermicompost
After a few months, you’ll notice a rich, dark compost accumulating at the bottom of your bin. Here’s how to harvest your vermicompost:
- Stop Feeding: A week before harvesting, stop adding new food to encourage the worms to finish processing the existing waste.
- Separate Worms: Gently move the compost to one side of the bin and add fresh bedding and food to the other side. The worms will migrate to the new food, allowing you to collect the finished compost.
- Collect Compost: Remove the vermicompost, ensuring to leave some behind to inoculate the new bedding with beneficial microbes.
Using Vermicompost in Your Garden
Vermicompost can be used in a variety of ways to enrich your garden soil:
- Soil Amendment: Mix it into garden soil to improve texture and fertility.
- Potting Mix: Blend it with potting soil for container plants.
- Top Dressing: Sprinkle it on the surface of the soil around plants to provide a slow-release fertilizer.
- Compost Tea: Soak vermicompost in water to create a nutrient-rich liquid fertilizer.
Troubleshooting Common Issues
Even with the best intentions, you might encounter some challenges with your worm bin.
- Bad Odors: Typically caused by overfeeding or improper aeration. Reduce food intake and fluff the bedding.
- Fruit Flies: Cover food with bedding material and avoid leaving food exposed.
- Excess Moisture: Add more dry bedding to absorb the moisture and improve drainage.
- Worms Escaping: Check moisture levels and ensure the bin is not too dry or too wet.
Conclusion
vermicomposting process process is a fantastic way to recycle organic waste and create nutrient-rich compost for your garden. With just a little effort and the help of some hardworking worms, you can turn kitchen scraps into a valuable resource for your plants. Happy composting!
About vermiculture
Vermiculture, also known as vermicomposting process, is the process of using worms to decompose organic waste into nutrient-rich compost. This method of composting leverages the natural digestion process of worms to break down food scraps, garden waste, and other organic materials, turning them into a valuable soil amendment.
Key Components of Vermiculture
- Worms: The most commonly used worms in vermiculture are Eisenia fetida, also known as red wigglers or red worms. These worms are particularly effective at breaking down organic matter.
- Bedding: This provides a habitat for the worms. Common bedding materials include shredded newspaper, cardboard, straw, and coconut coir. The bedding should be kept moist but not waterlogged.
- Organic Waste: Food scraps such as vegetable peels, fruit rinds, coffee grounds, and eggshells are excellent for vermicomposting process. Avoid adding meat, dairy, oily foods, and acidic substances like citrus in large quantities, as these can harm the worms or create odors.
- Bin: A vermicomposting process bin can be made from plastic, wood, or other materials. It should have holes for ventilation and drainage to keep the environment moist but not too wet.
Benefits of Vermiculture
- Soil Health: The compost produced, known as vermicompost or worm castings, is rich in nutrients and beneficial microorganisms that improve soil structure, fertility, and water retention.
- Waste Reduction: Vermiculture helps reduce household waste by converting food scraps and other organic materials into valuable compost, thus diverting them from landfills.
- Sustainability: It is an eco-friendly method of recycling organic waste and can be practiced on a small scale at home or on a larger scale in commercial operations.
Steps to Start Vermiculture
- Prepare the Bin: Choose a suitable container and add bedding material. Till the mattress resembles a damp sponge, moisten it.
- Add Worms: Introduce red wigglers to the bin. A pound of worms (approximately 1,000 worms) is a good starting amount for most home bins.
- Feed the Worms: Add food scraps by burying them in the bedding. Start with small amounts and increase as the worms adapt and reproduce.
- Upkeep of the Bin: Keep the bin somewhere cool and dark. Monitor moisture levels, and add water if the bedding becomes too dry. Ensure good airflow to prevent odors.
- Harvest the Compost: After a few months, the worms will have converted the waste into compost. Separate the worms from the compost by moving the contents to one side of the bin and adding fresh bedding and food to the other side. The worms will migrate, allowing you to harvest the compost.
Challenges and Solutions
- Odor: If the bin smells, it may be too wet or contain inappropriate food items. Adjust moisture levels and remove any problematic food.
- Pests: Fruit flies and other pests can be deterred by burying food scraps and keeping the bin covered.
- Overfeeding: Adding too much food can overwhelm the worms.Increase gradually after starting with smaller quantities.
Vermiculture is a simple, effective way to recycle organic waste and create high-quality compost for gardening and agriculture. With proper care and maintenance, a vermiculture system can thrive and provide ongoing benefits for the environment and soil health.
Composting and vermicomposting process
Composting and vermicomposting process are both methods of recycling organic waste into valuable soil amendments. While they share the goal of transforming waste into nutrient-rich compost, they differ in their processes and components.
Composting
Traditional Composting
Traditional composting involves the aerobic decomposition of organic matter by microorganisms in a controlled environment.
Key Components:
- Organic Waste: This includes a mix of green materials (nitrogen-rich) like vegetable scraps, grass clippings, and coffee grounds, and brown materials (carbon-rich) like leaves, straw, and cardboard.
- Moisture: The compost pile should be kept moist, like a wrung-out sponge, to support microbial activity.
- Aeration: Turning the compost pile regularly introduces oxygen, which is essential for aerobic decomposition.
- Heat: Microbial activity generates heat, which can kill pathogens and weed seeds. A well-managed compost pile can reach temperatures between 130-160°F (54-71°C).
Benefits:
- Nutrient-Rich Soil Amendment: Compost improves soil structure, water retention, and nutrient content.
- Waste Reduction: Composting diverts organic waste from landfills, reducing methane emissions and landfill use.
- Sustainability: It is an eco-friendly method of recycling organic materials back into the ecosystem.
Process:
- Gather Materials: Collect a balanced mix of green and brown materials.
- Build the Pile: Layer the materials, starting with coarse materials at the bottom for aeration.
- Maintain: Turn the pile regularly to aerate it and ensure even decomposition. Monitor moisture levels.
- Harvest: Compost is ready when it is dark, crumbly, and has an earthy smell, typically after 2-6 months.
vermicomposting process
vermicomposting process, or worm composting, uses worms to break down organic waste into high-quality compost.
Key Components:
- Worms: Red wigglers (Eisenia fetida) are the most commonly used worms due to their efficiency in decomposing organic matter.
- Bedding: Provides a habitat for the worms. Common materials include shredded newspaper, cardboard, and coconut coir.
- Organic Waste: Similar to traditional composting but more selective. Avoid meat, dairy, oily foods, and large amounts of acidic items.
- Bin: A container with ventilation and drainage to maintain a moist but not waterlogged environment.
Benefits:
- High-Quality Compost: Vermicompost is exceptionally rich in nutrients and beneficial microorganisms.
- Reduced Odor: Properly managed vermicomposting process bins have little to no odor, making them suitable for indoor use.
- Efficient Waste Recycling: Worms can process organic waste quickly, producing compost in a few months.
Process:
- Prepare the Bin: Add moist bedding to the bin.
- Add Worms: Introduce red wigglers to the bedding.
- Feed the Worms: Bury small amounts of food scraps in the bedding. Increase food as the worm population grows.
- Maintain: Keep the bin in a cool, dark place. Monitor moisture levels and ensure good airflow.
- Harvest: Separate worms from compost by moving the contents to one side and adding fresh bedding and food to the other.You will be able to gather the compost since the worms will move.
Differences Between Composting and vermicomposting process
- Organisms Involved: Traditional composting relies on microorganisms, while vermicomposting process uses worms.
- Space Requirements: vermicomposting process can be done in smaller spaces, including indoors, whereas traditional composting typically requires more space.
- Maintenance: vermicomposting process requires more frequent attention to feed worms and maintain their habitat, while traditional composting involves regular turning and monitoring of the pile.
- Compost Quality: Vermicompost is often richer in nutrients and microorganisms compared to traditional compost.
Conclusion
Both composting and vermicomposting process are effective methods of recycling organic waste into valuable compost. The choice between them depends on factors such as available space, the amount of organic waste, and personal preferences. By understanding the differences and benefits of each method, individuals can choose the best approach for their composting needs and contribute to a more sustainable environment.
Earthworms for vermicomposting process
Earthworms are essential for vermicomposting process, a process that uses worms to decompose organic waste into nutrient-rich compost. Not all earthworms are suitable for this process; the most commonly used species is Eisenia fetida, also known as the red wiggler or red worm. Here’s a detailed look at why these worms are ideal for vermicomposting process and how to manage them effectively.
Why Red Wigglers?
Adaptability: Red wigglers thrive in decomposing organic matter and can tolerate a wide range of environmental conditions, making them perfect for composting bins.
Efficiency: They consume a significant amount of organic waste relative to their body weight, converting it into high-quality compost.
Reproduction: Red wigglers reproduce quickly, ensuring a steady population to maintain the composting process.
Characteristics of Red Wigglers
- Size: Typically 2-4 inches long.
- Color: Reddish-brown.
- Habitat: Prefer the top layers of soil or organic matter, where they can easily access decomposing material.
Setting Up a vermicomposting process System
- Choose a Bin: Select a container with good ventilation and drainage. Plastic or wooden bins work well.
- Prepare Bedding: Use materials like shredded newspaper, cardboard, straw, or coconut coir. Moisten the bedding until it’s damp but not soaked.
- Add Worms: Introduce red wigglers to the bin. A pound of worms (approximately 1,000 worms) is a good starting amount for most home systems.
- Feed the Worms: Add food scraps such as vegetable peels, fruit rinds, coffee grounds, and eggshells. Avoid meat, dairy, oily foods, and large quantities of acidic items.
- Upkeep of the Bin: Keep the bin somewhere cool and dark.Monitor moisture levels and ensure proper ventilation.
Feeding and Maintenance
- Feeding: Start with small amounts of food and gradually increase as the worms adjust. Bury the food scraps in the bedding to prevent odors and pests.
- Moisture: The bedding should be as moist as a wrung-out sponge. Add water if it becomes too dry, and add dry bedding if it gets too wet.
- Aeration: Gently turn the contents occasionally to ensure proper airflow.
Harvesting Vermicompost
- Separate Worms and Compost: Move the contents of the bin to one side and add fresh bedding and food to the other. The new food source will cause the worms to migrate.
- Collect Compost: After a few weeks, harvest the compost from the side the worms have vacated. The compost ought to smell earthy, be crumbly, and be dark.
Benefits of Using Red Wigglers
- High-Quality Compost: Vermicompost is rich in nutrients and beneficial microorganisms, improving soil health and fertility.
- Waste Reduction: vermicomposting process diverts organic waste from landfills, reducing methane emissions and landfill use.
- Eco-Friendly: It is a sustainable method of recycling organic materials and can be done on a small scale at home or on a larger scale in commercial operations.
Common Issues and Solutions
- Odor: A bad smell usually indicates overfeeding or too much moisture. Adjust the feeding rate and moisture levels accordingly.
- Pests: Fruit flies and other pests can be minimized by burying food scraps and keeping the bin covered.
- Overfeeding: Adding too much food can overwhelm the worms. Start with small amounts and increase as the worm population grows.
Preparation of vermicomposting
Preparing for vermicomposting involves several steps to create a suitable environment for the worms to thrive and effectively convert organic waste into compost. Here’s a detailed guide on how to set up and maintain a vermicomposting process system.
Step-by-Step Guide to vermicomposting process
1. Choose a Bin
- Size: The size of the bin depends on the amount of waste you generate. A typical household bin is around 10-20 gallons.
- Material: Plastic or wooden bins are commonly used. Ensure the bin is opaque to keep out light.
- Ventilation and Drainage: Drill small holes in the sides and bottom of the bin for airflow and drainage. Place a tray underneath to catch any excess liquid (worm tea), which is also beneficial for plants.
2. Prepare Bedding
- Materials: Use shredded newspaper, cardboard, straw, or coconut coir. Avoid glossy or colored paper.
- Moisture: Moisten the bedding until it feels like a damp sponge. Too much water can drown the worms, and too little can dehydrate them.
3. Add Worms
- Type: Red wigglers (Eisenia fetida) are ideal for vermicomposting process.
- Quantity: Start with about 1 pound (approximately 1,000 worms) for a typical household bin. This amount can handle about half a pound of food waste per day.
4. Add Food Waste
- Types of Waste: Suitable food scraps include fruit and vegetable peels, coffee grounds, tea bags, crushed eggshells, and small amounts of bread or grains.
- Avoid: Meat, dairy, oily foods, spicy foods, and large amounts of citrus or onion. These can harm the worms and create odors.
- Feeding: Bury the food scraps in the bedding to avoid attracting pests and reduce odors. Start with small amounts and gradually increase as the worms adjust.
5. Maintain the Bin
- Location: Keep the bin in a cool, dark place. Ideal temperatures for worms are between 55-77°F (13-25°C).
- Moisture: Check the moisture level regularly. If it gets too dry, add more water; if it gets too wet, add more dry bedding.
- Aeration: Occasionally turn the contents of the bin gently to provide airflow and prevent compacting.
6. Harvesting Vermicompost
- Migration Method: Push the compost to one side of the bin and add fresh bedding and food to the other side. The worms will migrate to the new food source over a few weeks.
- Manual Separation: Spread the compost on a plastic sheet under bright light. The worms will burrow away from the light, allowing you to collect the compost from the surface.
Benefits of vermicomposting process
- Nutrient-Rich Compost: Vermicompost is rich in nutrients and beneficial microorganisms, improving soil health and fertility.
- Waste Reduction: vermicomposting process reduces household waste by converting food scraps into valuable compost.
- Sustainability: It’s an eco-friendly method of recycling organic materials, reducing landfill use and methane emissions.
Troubleshooting Common Issues
- Odor: If the bin smells bad, it may be overfed or too wet. Adjust feeding and moisture levels accordingly.
- Pests: Fruit flies and other pests can be minimized by burying food scraps and keeping the bin covered.
- Worm Health: If worms are dying or escaping, check for extreme temperatures, improper moisture levels, or unsuitable food.
Conclusion
Setting up a vermicomposting process system involves choosing the right bin, preparing suitable bedding, adding the appropriate type and quantity of worms, and maintaining proper feeding and environmental conditions. By following these steps, you can efficiently convert organic waste into nutrient-rich compost, benefiting both your garden and the environment.
Conclusion
Red wigglers are the ideal earthworms for vermicomposting process due to their adaptability, efficiency, and rapid reproduction. By setting up and maintaining a vermicomposting process system properly, you can recycle organic waste into high-quality compost, benefiting both your garden and the environment.
Frequently Asked Questions (FAQs)
1. How long does it take to start seeing compost from vermicomposting process process? It typically takes 2-3 months to see the first batch of vermicompost, depending on the conditions and how well the bin is maintained.
2. Can I use any type of worm for vermicomposting process process? While you can use various worms, red wigglers are the most effective and commonly used due to their ability to thrive in compost bins.
3. What should I do if my worm bin smells bad? Bad odors are usually a sign of overfeeding or poor aeration. Reduce the amount of food waste and ensure the bedding is properly aerated.
4. How do I know if my worms are healthy? Healthy worms are active and found throughout the bin. If they are sluggish or concentrated in one area, check for moisture and temperature issues.
5. Can vermicomposting process process be done indoors? Yes, vermicomposting process process can be done indoors. It’s an excellent solution for those with limited outdoor space, as long as you maintain proper conditions within the bin.
IN HINDI
वर्मीकंपोस्टिंग के लिए अंतिम गाइड: कचरे को पोषक तत्वों से भरपूर मिट्टी में बदलना
क्या आप खाने के बचे हुए टुकड़ों को बर्बाद होते देखकर थक गए हैं? क्या आप चाहते हैं कि आपके रसोई के कचरे को आपके बगीचे के लिए किसी मूल्यवान चीज़ में बदलने का कोई तरीका हो? खैर, आप किस्मतवाले हैं! वर्मीकंपोस्टिंग एक बेहतरीन उपाय है जो कीड़ों की शक्ति का उपयोग करके आपके जैविक कचरे को पोषक तत्वों से भरपूर मिट्टी में बदल सकता है। इस लेख में, हम वर्मीकंपोस्टिंग प्रक्रिया के बारे में विस्तार से जानेंगे और आपको दिखाएंगे कि घर पर अपना खुद का वर्म बिन शुरू करना कितना आसान है।
विषय-सूची
Sr#
शीर्षक
1
वर्मीकंपोस्टिंग का परिचय
2
वर्मीकंपोस्टिंग क्या है? 3
वर्मीकंपोस्टिंग के लाभ
4
सही कीड़े चुनना
5
अपना वर्म बिन सेट करना
6
अपने कीड़ों को खिलाना
7
अपने वर्म बिन का रखरखाव करना
8
वर्मीकंपोस्ट की कटाई
9
अपने बगीचे में वर्मीकंपोस्ट का उपयोग करना
10
सामान्य समस्याओं का निवारण करना
11
निष्कर्ष
12
अक्सर पूछे जाने वाले प्रश्न (FAQ)
वर्मीकंपोस्टिंग का परिचय
आइए बारीकियों में जाने से पहले बुनियादी बातों से शुरुआत करें। वर्मीकंपोस्टिंग कीड़ों की प्राकृतिक पाचन प्रक्रिया का उपयोग करके जैविक कचरे को मूल्यवान खाद में बदलने का एक सरल लेकिन प्रभावी तरीका है। कल्पना कीजिए कि आप अपने रसोई के कचरे को अपने बगीचे के लिए काले सोने में बदल रहे हैं। आश्चर्यजनक लगता है, है न?
वर्मीकंपोस्टिंग क्या है?
वर्मीकंपोस्टिंग एक ऐसी प्रक्रिया है जिसमें कीड़ों, आमतौर पर लाल विगलर (ईसेनिया फेटिडा) का उपयोग करके जैविक कचरे को पोषक तत्वों से भरपूर पदार्थ में विघटित किया जाता है जिसे वर्मीकंपोस्ट या वर्म कास्टिंग के रूप में जाना जाता है। यह प्रक्रिया न केवल लैंडफिल में जाने वाले कचरे की मात्रा को कम करती है बल्कि आपके पौधों के लिए अत्यधिक लाभकारी मिट्टी संशोधन भी पैदा करती है।
वर्मीकंपोस्टिंग के लाभ
वर्मीकंपोस्टिंग के कई लाभ हैं, जो इसे आपके और पर्यावरण दोनों के लिए एक जीत-जीत समाधान बनाता है:
अपशिष्ट को कम करता है: वर्मीकंपोस्टिंग लैंडफिल में समाप्त होने वाले जैविक कचरे की मात्रा को काफी कम कर देता है।
पोषक तत्वों से भरपूर मिट्टी का उत्पादन करता है: वर्म कास्टिंग पोषक तत्वों से भरपूर होते हैं जो मिट्टी की उर्वरता को बढ़ाते हैं और स्वस्थ पौधों के विकास को बढ़ावा देते हैं।
पर्यावरण के अनुकूल: यह जैविक पदार्थों को रीसायकल करने का एक प्राकृतिक और टिकाऊ तरीका है।
लागत-प्रभावी: अपनी खुद की खाद बनाकर, आप स्टोर से खरीदे गए उर्वरकों और मिट्टी कंडीशनर पर पैसे बचाते हैं।
सही कीड़े चुनना
जब वर्मीकंपोस्टिंग की बात आती है, तो सभी कीड़े समान नहीं होते हैं.. सबसे ज़्यादा इस्तेमाल किए जाने वाले कीड़े लाल विगलर हैं क्योंकि वे बेहतरीन डीकंपोजर हैं. यहाँ सही कीड़े चुनने के लिए कुछ सुझाव दिए गए हैं:
लाल विगलर (ईसेनिया फेटिडा): ये अपनी उच्च प्रजनन दर और कार्बनिक पदार्थों को तोड़ने की दक्षता के कारण सबसे लोकप्रिय विकल्प हैं.
यूरोपियन नाइटक्रॉलर (ईसेनिया हॉर्टेंसिस): एक और अच्छा विकल्प, हालांकि वे लाल विगलर की तुलना में बड़े और कम कुशल होते हैं.
अपना वर्म बिन सेट अप करना
वर्म बिन बनाना आसान है और इसे आपके घर में पहले से मौजूद सामग्रियों से बनाया जा सकता है. यहाँ आपके वर्मीकंपोस्टिंग सिस्टम को स्थापित करने के लिए चरण-दर-चरण मार्गदर्शिका दी गई है:
आवश्यक सामग्री
एक डिब्बा या कंटेनर (प्लास्टिक या लकड़ी)
बिस्तर के लिए सामग्री: नारियल कॉयर, कार्डबोर्ड, या कटा हुआ अख़बार
एक मुट्ठी भर बगीचे की मिट्टी
लाल विगलर (कीड़े)
सेट अप करने के चरण
डिब्बा तैयार करें: वेंटिलेशन और जल निकासी के लिए डिब्बे में छोटे छेद करें।
बिस्तर जोड़ें: डिब्बे को नम बिस्तर सामग्री से भरें, सुनिश्चित करें कि यह नम है लेकिन बहुत गीला नहीं है।
मिट्टी जोड़ें: लाभकारी सूक्ष्मजीवों को पेश करने के लिए बिस्तर पर थोड़ी मात्रा में बगीचे की मिट्टी छिड़कें।
कीड़े जोड़ें: कीड़ों को धीरे से बिस्तर के ऊपर रखें।
ढक्कन: डिब्बे पर एक ढक्कन रखें, सुनिश्चित करें कि इसमें हवा के संचार के लिए छेद हैं।
अपने कीड़ों को खिलाना
कीड़े खाने में बहुत ज़्यादा नखरे नहीं करते, लेकिन उन्हें खिलाने के मामले में कुछ बातें हैं जो आपको नहीं करनी चाहिए:
क्या खिलाएँ
फल और सब्ज़ियों के अवशेष
कॉफ़ी के अवशेष और चाय की थैलियाँ
कुचले हुए अंडे के छिलके
कटा हुआ कागज़ और कार्डबोर्ड
क्या न खिलाएँ
मांस और डेयरी उत्पाद
तेल और चिकनाई वाले खाद्य पदार्थ
अधिक मात्रा में खट्टे फल
प्याज़ और लहसुन
अपने कीड़ों को थोड़ी मात्रा में खिलाएँ और देखें कि वे कितनी जल्दी खाना खाते हैं। ज़्यादा खिलाने से अप्रिय गंध आ सकती है और कीट आकर्षित हो सकते हैं।
अपने कृमि बिन को बनाए रखना
सफल वर्मीकंपोस्टिंग के लिए अपने कृमि बिन को अच्छी स्थिति में रखना ज़रूरी है। अपने कीड़ों के लिए स्वस्थ वातावरण सुनिश्चित करने के लिए यहाँ कुछ सुझाव दिए गए हैं:
नमी का स्तर: निचोड़े हुए स्पंज के समान नमी का स्तर बनाए रखें। बहुत ज़्यादा सूखा होने पर कीड़े निर्जलित हो जाएँगे; बहुत ज़्यादा गीला होने पर अवायवीय स्थितियाँ पैदा हो सकती हैं।
तापमान: डिब्बे को ऐसी जगह पर रखें जहाँ तापमान 55°F और 77°F (13°C से 25°C) के बीच रहे।
वायु संचार: उचित वायु प्रवाह सुनिश्चित करने और कॉम्पैक्टिंग को रोकने के लिए नियमित रूप से बिस्तर को फुलाएँ।
निगरानी: अपने कीड़ों की नियमित रूप से जाँच करें ताकि यह सुनिश्चित हो सके कि वे स्वस्थ और सक्रिय हैं।
वर्मीकम्पोस्ट की कटाई
कुछ महीनों के बाद, आप अपने डिब्बे के तल पर एक समृद्ध, गहरे रंग की खाद जमा होते हुए देखेंगे। यहाँ वर्मीकम्पोस्ट की कटाई करने का तरीका बताया गया है:
खाद डालना बंद करें: कटाई से एक सप्ताह पहले, कीड़ों को मौजूदा कचरे को संसाधित करने के लिए प्रोत्साहित करने के लिए नया भोजन डालना बंद करें।
कीड़ों को अलग करें: खाद को डिब्बे के एक तरफ धीरे से खिसकाएं और दूसरी तरफ ताजा बिस्तर और भोजन डालें। कीड़े नए भोजन की ओर चले जाएंगे, जिससे आप तैयार खाद को इकट्ठा कर सकेंगे।
खाद इकट्ठा करें: वर्मीकम्पोस्ट को हटा दें, यह सुनिश्चित करते हुए कि कुछ पीछे रह जाए ताकि नए बिस्तर में लाभकारी सूक्ष्मजीवों का संचार हो सके।
अपने बगीचे में वर्मीकम्पोस्ट का उपयोग करना
अपने बगीचे की मिट्टी को समृद्ध करने के लिए वर्मीकम्पोस्ट का उपयोग कई तरीकों से किया जा सकता है:
मिट्टी में सुधार: बनावट और उर्वरता को बेहतर बनाने के लिए इसे बगीचे की मिट्टी में मिलाएँ।
पॉटिंग मिक्स: इसे कंटेनर पौधों के लिए पॉटिंग मिट्टी के साथ मिलाएँ।
टॉप ड्रेसिंग: इसे पौधों के चारों ओर मिट्टी की सतह पर छिड़कें ताकि यह धीमी गति से निकलने वाला उर्वरक प्रदान करे।
कम्पोस्ट चाय: पोषक तत्वों से भरपूर तरल उर्वरक बनाने के लिए वर्मीकम्पोस्ट को पानी में भिगोएँ।
सामान्य समस्याओं का निवारण
सबसे अच्छे इरादों के साथ भी, आपको अपने कृमि बिन के साथ कुछ चुनौतियों का सामना करना पड़ सकता है।
खराब गंध: आमतौर पर अधिक भोजन या अनुचित वायु संचार के कारण होती है। भोजन का सेवन कम करें और बिस्तर को फुलाएँ।
फल मक्खियाँ: भोजन को बिस्तर की सामग्री से ढँक दें और भोजन को खुला न छोड़ें।
अत्यधिक नमी: नमी को सोखने और जल निकासी में सुधार करने के लिए अधिक सूखा बिस्तर लगाएँ।
कीड़े भागना: नमी के स्तर की जाँच करें और सुनिश्चित करें कि बिन बहुत सूखा या बहुत गीला न हो।
निष्कर्ष
वर्मीकंपोस्टिंग जैविक कचरे को रीसायकल करने और अपने बगीचे के लिए पोषक तत्वों से भरपूर खाद बनाने का एक शानदार तरीका है। थोड़े से प्रयास और कुछ मेहनती कीड़ों की मदद से, आप रसोई के कचरे को अपने पौधों के लिए एक मूल्यवान संसाधन में बदल सकते हैं। हैप्पी कम्पोस्टिंग!
अक्सर पूछे जाने वाले प्रश्न (FAQ)
- वर्मीकंपोस्टिंग से खाद दिखने में कितना समय लगता है? परिस्थितियों और बिन के रखरखाव की अच्छी तरह से निगरानी के आधार पर, वर्मीकंपोस्ट का पहला बैच दिखने में आमतौर पर 2-3 महीने लगते हैं।
- क्या मैं वर्मीकंपोस्टिंग के लिए किसी भी तरह के कीड़े का इस्तेमाल कर सकता हूँ? वैसे तो आप कई तरह के कीड़े इस्तेमाल कर सकते हैं, लेकिन लाल रंग के कीड़े सबसे कारगर होते हैं और आमतौर पर खाद के डिब्बे में पनपने की वजह से इनका इस्तेमाल किया जाता है।
- अगर मेरे वर्म बिन से बदबू आ रही है तो मुझे क्या करना चाहिए? बदबू आमतौर पर ज़्यादा खाने या खराब हवा के कारण होती है। खाने की बर्बादी कम करें और सुनिश्चित करें कि बिस्तर ठीक से हवादार हो।
- मुझे कैसे पता चलेगा कि मेरे कीड़े स्वस्थ हैं? स्वस्थ कीड़े सक्रिय होते हैं और पूरे डिब्बे में पाए जाते हैं। अगर वे सुस्त हैं या एक ही जगह पर केंद्रित हैं, तो नमी और तापमान की समस्याओं की जाँच करें।
- क्या वर्मीकंपोस्टिंग घर के अंदर की जा सकती है? हाँ, वर्मीकंपोस्टिंग घर के अंदर की जा सकती है। यह उन लोगों के लिए एक बेहतरीन उपाय है जिनके पास सीमित बाहरी जगह है, बशर्ते आप डिब्बे के अंदर उचित वातावरण बनाए रखें।
Go and turn on towards organic farming to save future and thire save childs:
Elevate Plant Growth with Premium Bone Powder – Buy Now!
Organic Cow Dung Compost: Transform Your Garden Naturally
Premium Humic Acid for Healthy Plants | Enhance Soil & Boost Growth
Boost Plant Growth Naturally with Mustard Cake | Organic Fertilizer
Transform Your Garden with NPK Fertilizer | Boost Growth by 30%
Premium Perlite for Enhanced Gardening | Buy Now
Live Earthworms with Enhance Your Garden (soil health)
1 Neem Khali: Unveiling the Wonders of Nature
1Transform your garden with vermiwash-buy now
1 Premium quality Vermicompost [ केचुआ खाद ]
Follow us:


[…] Vermicomposting is the process of using worms, primarily red wigglers, to convert organic waste into nutrient-rich compost. This method is not just about reducing waste; it’s about transforming kitchen scraps, garden clippings, and other organic matter into a valuable resource for your garden. Imagine your waste being turned into black gold—this is essentially what vermicomposting does. […]